Initial Setup
The following steps need to be completed in the specified order:
-
Install and configure IIS on the server system.
-
Install EHX Server.
-
Install EHX Client on each client PC.
-
Configure each client PC to access the server.
-
Login to the server from a client machine.
| Note: | The default installation path is assumed to be C:\Program Files\ClearCom\Eclipse HX Configuration Server. |
Installing and Configuring IIS on the Server
Stage 1 - Verify IIS is installed
To verify that IIS has been installed:
-
Go to the Windows Control Panel.
-
Double-click Administrative Tools.
-
Verify Internet Information Services exists and is at version 5.0 or above.
| Notes: | For more information about the options that are not selected by default, but which must be enabled for EHX to run successfully, see IIS options that must be enabled below. |
If IIS does not exist on the server, complete Stage 1b. Otherwise, proceed to Stage 2.
Stage 1b - Install IIS
| Note: | The exact procedure may vary depending on the version of Microsoft Windows. |
To install IIS:
-
Open the Windows Control Panel.
-
Double-click Programs and Features.
-
Select Turn Windows features on and off.
-
Select Internet Information Services and complete the install using the wizard.
| Note: | For more information about the options that are not selected by default, but which must be enabled for EHX to run successfully, see IIS options that must be enabled below. |
IIS options that must be enabled
When installing Internet Information Services, there are certain options which are not selected by default, and that must be enabled to allow EHX to run successfully. (You can select any other options in addition to these, without risk to the installation).
In Windows:
-
Go to Control Panel.
-
Select Programs > Turn Windows features on or off.
-
Under Internet Information Services, make sure the following options are enabled:
-
Web Management Tools
- IIS 6 Management Compatibility
IIS 6 Management Console
IIS6 Scripting Tools
IIS6 WMI Compatibility
IIS Metabase and IIS6 configuration compatibility
- IIS Management Console
World Wide Web Services
- Application Development Features
Net Extensibility
ASP.NET
ISAPI Extensions
ISAPI Filters
- Common HTTP Features
Default Document
Directory Browsing
HTTP Errors
Static Content
- Performance Features
Static Content Compression
- Security
Basic Authentication
Windows Authentication
-
Under Microsoft .Net Framework 3.0, make sure the following options are enabled:
-
Windows Communication Foundation HTTP Activation
-
Windows Communication Foundation Non-HTTP Activation
In Windows Server:
-
Go to Server Manager.
-
Click Add Roles.
-
Select Web server (IIS) and click Next.
-
Under Role Services, ensure the following options are enabled:
-
Web Management Tools
- IIS 6 Management Compatibility
IIS 6 Management Console
IIS6 Scripting Tools
IIS6 WMI Compatibility
IIS Metabase and IIS6 configuration compatibility
- IIS Management Console
World Wide Web Services
- Application Development Features
Net Extensibility
ASP.NET
ISAPI Extensions
ISAPI Filters
- Common HTTP Features
Default Document
Directory Browsing
HTTP Errors
Static Content
- Performance Features
Static Content Compression
- Security
Basic Authentication
Windows Authentication
-
From Server Manager, click Add Features.
-
Ensure that the following features are enabled:
-
Net Framework 3.5.1 Features
- Net Framework 3.5.1
-
WCF Activation
-
HTTP Activation
-
Non-HTTP Activation
-
In Windows 10:
-
Go to Control Panel.
-
Select Programs > Turn Windows features on or off.
-
Under Internet Information Services, make sure the following options are enabled:
-
Web Management Tools
- IIS 6 Management Compatibility
IIS 6 Management Console
IIS 6 Scripting Tools
IIS 6 WMI Compatibility
IIS Metabase and IIS 6 configuration compatibility
- IIS Management Console
- IIS Management Scripts and Tools
World Wide Web Services
- Application Development Features
NET Extensibility 3.5
NET Extensibility 4.5
ASP.NET 3.5
ASP.NET 4.7
ISAPI Extensions
ISAPI Filters
- Common HTTP Features
Default Document
Directory Browsing
HTTP Errors
Static Content
- Performance Features
Static Content Compression
- Security
Basic Authentication
Windows Authentication
-
Under .NET Framework 3.5 (includes .Net 2.0 and 3.0)
-
Windows Communication Foundation HTTP Activation
-
Windows Communication Foundation Non-HTTP Activation
-
Under .NET Framework 4.7 Advanced
- ASP
- ASP.NET 4.7
-
WCF Services
- HTTP Activation
- Message Queuing (MSMQ) Activation
- Named Pipe Activation
- TCP Activation
- TCP Port Sharing
Stage 2 - Install EHX Server
-
Install EHX Server (Run the EHX server installation *.exe file).
Client configuration
An EHX client installation is required on each client system.
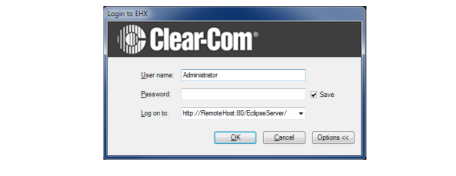
Login to the server from a client machine
-
At the EHX login dialog box click the Options button to display the Log on to field.
-
Type the following string, replacing <Machine Name> with the name of the EHX server: http://<Machine Name>/EclipseServer/.
The client must able to connect to the server to login. If it cannot connect an appropriate error is displayed. This problem may even be encountered in the case where the client is on the same machine as the server when the machine is not connected to the network.
If the access to the server is required with the machine in this state, setting the EHX server as http://127.0.0.1/EclipseServer/ allows this (this is using the network loopback address).
| Note: | To determine the EHX Server Machine Name log in to the EHX Server. Click Start and then Run. Type cmd into the box and click OK. At the command prompt type ipconfig /all. Use the listed Host Name as the EHX server name. |
Using Client/Server
Username
Each user is distinguished by Username and users on different clients should always use different Usernames when logging in to the EHX Server.
Usernames on the EHX server are set up by logging in to the EHX Server and using the User Management facility as described in the Connecting a Matrix section, to set up and manage users.
If a user on a client attempts to log in to the EHX Server with a Username that is already in use a warning is shown. If the new user continues, the existing user session is terminated, and the user who has now been logged out is informed.
Host name
When logging in to an EHX server running in client/server mode use the Options button to display the server that the user is logging on to and enter the server name explicitly instead of using the default local host name.